Saturday, August 20, 2011

One Little Birdie Flew From The Nest


Amanda is all packed up and moved into her new dorm room...ready for the "real" world to begin.  I think Rich put it best when he posted this on her facebook page - "Hold on tight pumpkin head, your life is about to begin, just remember you have a family who loves you, and God will be there to protect you when I'm not'.

I've been pushing this post to the back of my head for days now....Damn these kids for going and growing up on us.   If we did our job right, then she will be fine.  But a parent never stops worrying, the job is never done.  I pray that God watches over her, keeps her safe and helps her make the right choices, decisions and may the consequences of any mistakes she may make not be too harsh. 


We went shopping the other night to finish up any odds and ends she may need.  She actually did a pretty good job of getting everything else on her own, she even used alot of her own money to purchase things for her new room.  On the way we chatted and I snapped a pic or two and she said "Mom, please don't make me cry." 


Only a mom of a college freshman would cry over a stack of towels.


I think I did remarkably well myself and didn't shed any tears when we moved all her things.....of course, I've been teary eyed over the last few weeks anyway (maybe I'm all cried out?).  As for all the walking we did...well that just about killed me LOL!


We moved her things and then went home to rest and got a call for Anthony about a job.  I swear the kids have plotted against me...if it wasn't enough to help Amanda pack up and move, then Anthony had to go and get his FIRST job!   Yep, he's a working man now - busing tables at a local golf club/restaurant.

Later, after dropping off Anthony at HIS FIRST JOB (can't say that enough, I'm so shocked by it), I took Sarah, Nicholas and Nathan to visit with Amanda.  The kids wanted to see her new "house" and where she was going to live.


Girl.......has lots of unpacking to do.


Time to say goodnight or goodbye rather.


These two are really going to miss each other....


Fly away little Birdie...but don't forget who loves ya best !

Wednesday, August 17, 2011

Let The Count Down Begin....

(Actually it's less than 14 days now - We start August 29)


We made this craft last year as well and the kids loved it (a new tradition has begun).

To make this calendar, you will need:

construction paper
the printables found here and here
crayons or water color paints
glitter
glue
beads
stickers
buttons
ribbon
pom poms
and various other odds and ends


First, The boys colored and painted the "back to school" printables


Then we cut them out and glued them to some black construction paper and added some red around the edges to frame it and give it some pizazz.


Next, we got out some glitter and glue and added some sparkle to our numbers.


I cut different shades of construction paper in half and glued the numbers to the paper.


Then the real fun began....I threw a bunch of art supplies on the table (stickers, pom poms, buttons, etc.) and let kids decorate the papers.


Use a hole punch to punch holes in the bottom of the picture and the top of the number pages

Next, string some cute ribbon through the holes


Tie it in a bow


And Wahlah....

A cute way to count down those days til freedom school begins.


Tuesday, August 16, 2011

Kids Art Display


It seems like I get asked this all the time...

"What do you do with all the kids art projects when they are done?"


Well....first, I hang them up on the wall.  If there is a series of art like salt paintings or puffy painted ice cream cones I hang them on a line across the wall in the kitchen.  Why the kitchen? Because that is mostly where we hang out and also where we usually do all our crafting.  The pictures will hang there until we do another big project or I get tired of looking at them.  Secondly, if it's just one project like the penguin craft or the fish bowl craft, I tape them to the wall....again until we do something else or I get tired of looking at them. 

 Naturally, with six children I can't keep everything, otherwise my house would look like something off that "Hoarders: Buried Alive" TV show.  So, I try not to go overboard with saving every piece of paper they did.  I have Rubbermaid boxes in the garage where I store my keepsakes.  I just went through a few boxes the other day while working on this project and loved looking back at all those sweet, tender memories.


In my effort to display some of the kids special arts and crafts in a more "permanent" setting,  I searched the internet for fun and cute ways to display their things.  I really wanted something more "gallery" like --- I love looking at their art and I love remembering when we did them or if it was something they did at school, I want to keep it special too. 

At first, I was going to just use random picture frames I had around the house and went about spray painting them....but I didn't love it when I saw how they looked all together.  Even though they were all uniform in color, it just didn't "look" right to me.  So, I went to my trusty Dollar Tree store and bought some frames there.  I couldn't find any white ones (which is the color that I wanted), but I figured what the heck...that's what paint is for.  I bought the frames, made a quick trip to WalMart for paint and started painting the minute I walked in the front door.


The frames and paint cost about $15 total and I think it looks great.  There is space above to hang another line if I wanted and space on the sides for bigger projects.   And the best part of all is, if I get tired of looking at them, I can always switch the paintings, drawings and crafts for new ones and keep right on creating those precious memories for our family to enjoy.


Sunday, August 14, 2011

Caught My Eye.....Back To School

I am loving all these awesome, totally cute and fun back to school ideas.  Check out what caught my eye this week.

Isn't this ruler wreath the most clever thing you have ever seen!!


A cake shaped like a school bus.....Heck, yes -  LOVE it!


"Back to School" treat for teachers....Adorable, right?

(oreo pops covered in chocolate)

Of course, we need to celebrate with some cute cupcakes too


How about this adorable wreath made out of crayons


Such great, fun ideas!

What caught your eye this week?


Wednesday, August 10, 2011

What's That You Say.....It's National S'Mores Day

I made these bad boys and they were delish!


S'Mores Cupcakes

For the cupcakes

1 box yellow cake mix
1 cup crushed graham crackers
1 bag Nestle chocolate chunks

Heat oven to 350*
Mix cake mix according to package directions...Fold in graham cracker crumbs and chocolate chunks.
Fill cupcake liners....Bake 18-23 - mine took a little longer (25 mins instead).
Cool for about 10 mins and remove from the pans.
Then cool another 30 mins more before frosting.

For the frosting

1 jar (7oz) marshmallow creme
1 stick butter, softened
2 cups powdered milk
1-2 tsps milk

Soften the creme in the microwave for about 15 secs.
Beat creme, butter and powdered sugar on low speed til blended. Beat in milk a tsp at a time to make frosting spreadable.


**Notes: I wasn't happy with the way the frosting came out. It was a little runny, maybe try hardening in the fridge first before spreading or only add 1 tsp of milk. Or maybe try melting a large marshmallow and placing that on top instead of the frosting.    I refrigerated them to help "set" the frosting.


Monday, August 08, 2011

Design Your Own T'Shirt - Sandpaper Iron On


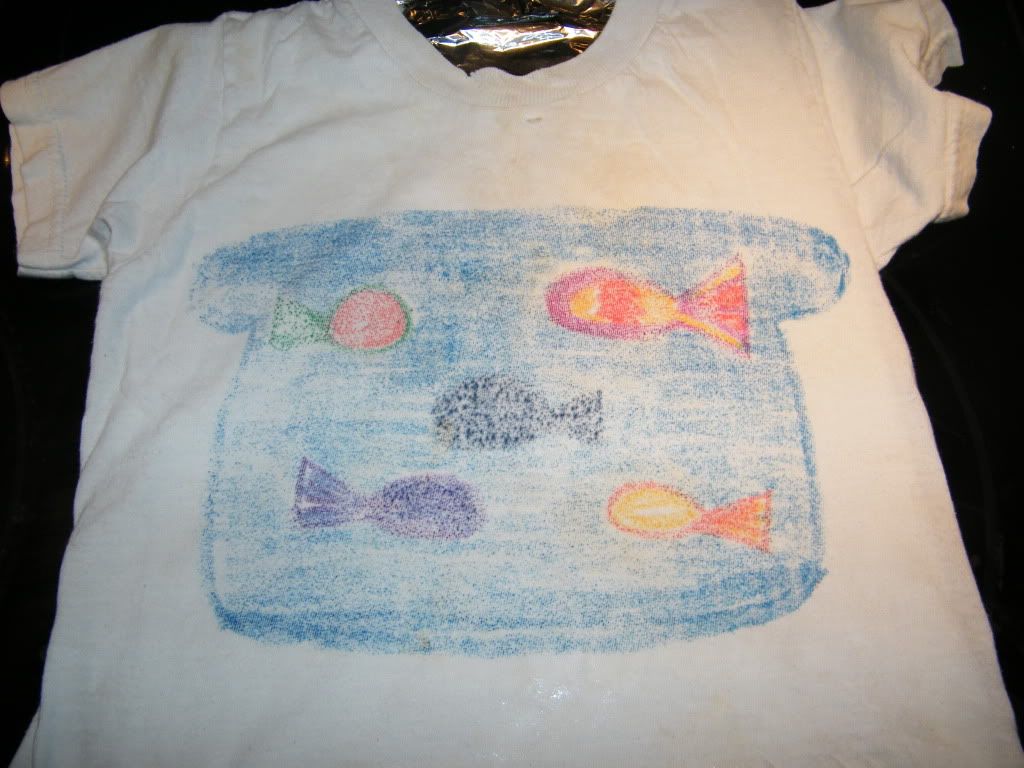
It worked...it really, really worked!  

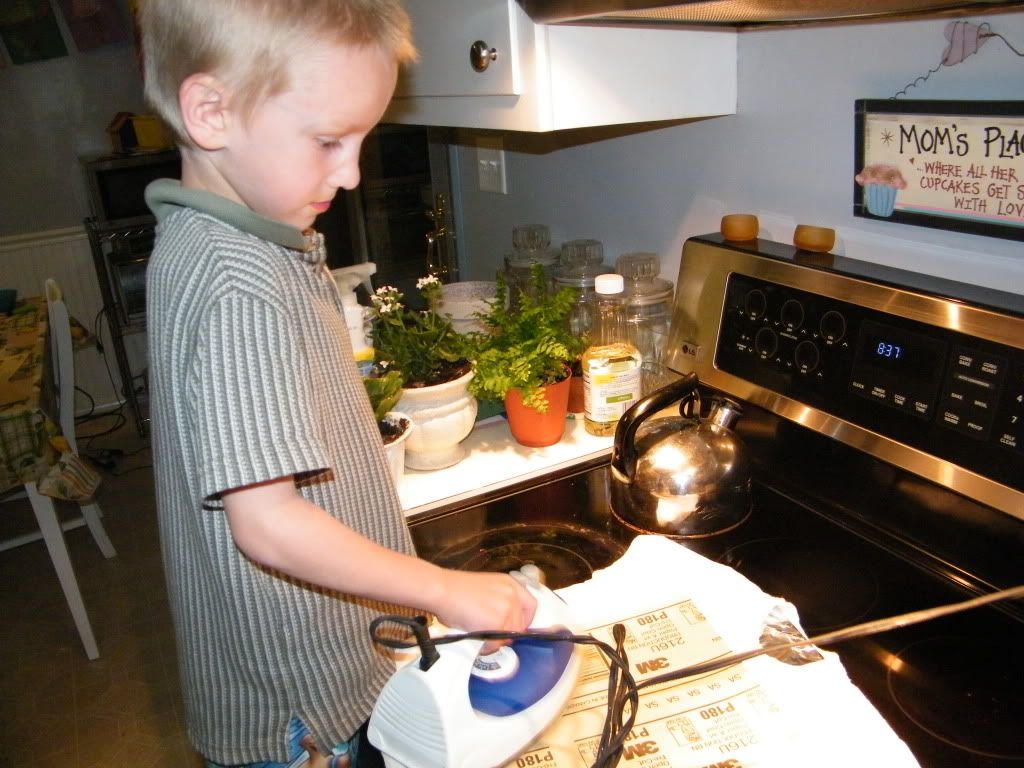
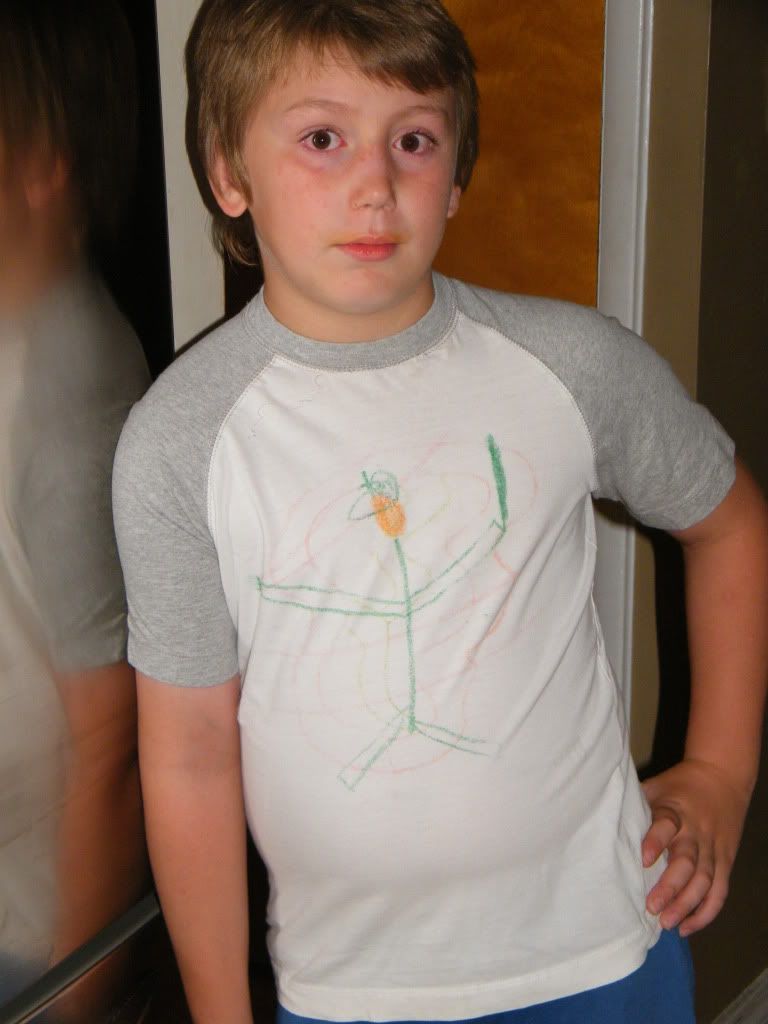
I saw this posted somewhere and wondered if it would actually work and it did.  And it was so much fun.  I had planned on it being a craft project for Nathan and Nicholas, but once everyone saw how the shirts came out, the whole family wanted to make one and I ran out of sand paper.

All you need is crayons, t'shirts, sand paper (we used fine grit 150 -180), foil, cardboard and an iron.


First color your design on the sandpaper (rough side up).


Wrap a piece of cardboard with foil...be careful not to wrinkle the foil.  The cardboard and foil keep the design from bleeding through the shirt.


Place the sandpaper (design side down) where you want it on the shirt and iron on a warm setting.  Pressing about 10 seconds or so over each section.


And wahlah...


Supposedly, you can wash the shirt in cold water and line dry and the design will stay on the shirt. I haven't washed them yet, so I can't tell you for sure if that part works.


Make sure that if you want to write something, you write it backwards.

(I, of course had to try it out first ;))

This craft was Easy Peasy and Fun, Fun, fun!!!


Linking to....

Wednesday, August 03, 2011

Winner of the Shabby Apple Dress Giveaway is....

#2 Ashley

"I have a new obsession with dresses, especially Shabby Apple dresses! This looks so pretty for an evening at a beach restaurant.

demureprincess7(at)gmail(dot)com"

Congratulations Ashley!! 

Thanks to everyone for participating in this giveaway...I have another fun giveaway coming soon!

Tuesday, August 02, 2011

Moms That Blog (The Interviews)

Introducing.......Kim - She's a homeschooling mother of nine and author of the blog and book Large Family Logistics.  And that's what makes her a great Mom That Blogs!


Tell us a bit about yourself.......My husband is Matt. We farm in south-east Iowa. He also works full time for a seed corn company. Our children are Brandt (20), Brock (18), Bridgette (15), BriAnne (13), Brook (11), Brian (9), Bronwyn (7), Brielle (5), Matthew (4). We work hard and play hard. My kids are free-range here on the farm. It’s all a big learning experience. We really get into 4-H projects. In the winter we do our bookwork.

Name 3 fun facts about yourself, that may surprise us......I live a mile north of my folks and two miles west of my inlaws. My husband and I grew up across the section from each other but never knew each other until we were 18 and 21. We met working for a seed corn company.

I don’t like to watch movies very often and if I do watch a movie, it had better have really good reviews.

I think that being a storm chaser would be fun. I like to watch the clouds and storms.

What is your blog about......Originally it was about managing the large family home. Now, I write stories that happen to us or have happened in our family life. I do reviews. Sometimes my opinions on things come out in a post. I answer questions that come into my email. I don’t write as often as I should. I used to write every day but Sunday and that brings in lots of readers. Now, I write once or twice a month, maybe. My kids are older and that is a different kind of busy. It’s a lot of talking and thinking and being their guidance/career counselor. It’s looking at what they’ve been doing and their strong points and helping them see other ways and points of view. It’s exhausting in a different way. It also requires praying all the time. The home management doesn’t require a lot of thinking anymore but guiding the older children certainly does. An older mom told me recently that a good question to ask older children or adult children is “How does this fit your worldview?” Everything centers around a person’s worldview.

 Why do you blog.......It’s a good outlet for family stories and photos for family and friends. It’s good for large family mamas to learn how other people do things, it’s always good to hear a different way. Reviews are great because you discover new and helpful products or learn to steer clear of a product.

Speaking of large families, what inspired you to write the book and when did you find the time.......I kept a journal where I wrote things that I did to make life with a bunch of little kids easier. I was learning everything the hard way, reading home management books, quizzing older ladies, and experimenting with different systems. I liked the idea of FlyLady and the emails that she sent out telling the reader what to do but it didn’t quite fit my life and lifestyle. So I set up a similar system in yahoo groups that suited me and other large homeschooling families and sent out a notice in a couple of groups I was a member of including the MOMYS email group. Moms were excited about it and wanted me to fill in the gaps with instruction so I started writing a blog. This was all back in the winter of 2004-2005. I have lots of memories of typing with one hand while holding a baby with the other. I’m pretty good at typing left hand only and right hand only. J  The blog took on a life of its own with moms asking questions and me answering how I do this, that and the other. All those years of studying, asking, reading, and the systems that I developed from that came pouring out of my fingers onto the blog site. So first it was my girls that inspired me and then it was the other moms that were struggling that inspired me to organize my writing into a book. I wrote it in the early morning in little bits. Organizing it and editing were the hardest parts. I set aside large blocks of time and did a lot of planning ahead and organizing so that I could sit down for more extended periods. I don’t sit down very well. I do a lot of writing in my head while I’m working at other things and then when I do sit down it comes out pretty fast. Editing—not so much fun.


What inspires you.......God’s Word inspires me to live more fully in Christ. To know Him and to make Him known. My family inspires me to create a beautiful life for all of us.


Do you have a bucket list? If so, Name a few things on it.......I want to hike a portion of the Appalachian Trail. I want to canoe in the Boundary Waters. I want to learn how to make a good bread in our wood fired brick oven (so far we just do pizza). I want to be a quilter someday when I have more time.


Do you read other blogs.......I don’t. I’m too busy with my family and our farm these days. I used to read a handful regularly. Those were: A Holy Experience by Ann Voskamp, Life in a Shoe by Kim Coghlan, Amy’s Humble Musings by Amy Scott, Spunky Homeschool by Karen Braun, Preschoolers and Peace by Kendra Fletcher, Buried Treasure by Carmon Friedrich, and LAF. When I do read blogs on quiet days, I go back to these old favorites which sometimes lead me on rabbit trails to other blogs. I love these blogs because they inspire me in my home and family life, make me think, make me cry and make me laugh.

Do you have any blogging advice that you would like to share.......Write with a purpose. Don’t let it, or the computer, supersede the relationships you have with your family.

You can read more about Kim by checking out her blog .... Large Family Logistics.  She shares lots of tips for cleaning and laundry and yummy recipes.  Her book is available through Vision Forum and Amazon


Monday, August 01, 2011

~ New Look ~

Yep.....same old blog.  Just a different header (with an updated pic).

What do you think?

Like it?

I used Sarah of Clover Lane's tutorial.  Her tutorial is excellent and she does all kinds of fancy things with hers.

She really breaks it down, step by step so that even a big dummy like me can do it.

So, if you're looking to re-design your blog without spending big bucks to do so, check out her tutorial.

I swear it's super easy.